Update: Just after 24 from the time of pickling I do a little taste test and Hubby says they are the best pickled eggs he's ever tested. After testing a few batches that I made and letting me know that something needs to be a bit different I'll take his word. Also said that I had better of wrote down the recipe so that I can make more 💋💋💓💓
Hi all you lovely crafters of the world.
Do you happen to have way to many eggs with no idea as to what to make with them.
How about pickling them. You can even use some beat juice to color them pretty.
Here is what I did to make my pickled eggs. Needless to say until they set hard to say if I got this right. But if I do need to change something I shall do an update to this post.
I have been expermenting a little so I do know that I got the vinegar/water figured out but as for the rest.
Start off with making sure you have boiled your eggs long enough to be hard boiled. Where we live I find it best to boil eggs for pickling for about a 1/2 hr. The eggs are hard boiled by 10 minutes but I boil longer for picked eggs.
Make sure you have a sealable jar that is big enough for 18 eggs.
Pickled Eggs
18 Eggs
3 Cups white vinegar
1 Cup water
2 Tbsp Mrs. Dash Garlic and herb
2 Tbsp Sugar
1 tsp seasoning salt
1 onion thinly sliced
Put your cooled shelled eggs into jar.
In a pot put your vinegar, water, spices, onion and sugar. Bring to a boil turn down so its a light boil and proceed to do light boil for 5 minutes.
Let broth cool some so that you don't break the jar. Pour over eggs, put on lid and move eggs to fridge.
Let the eggs set for about a week (lets the flavor get into the eggs better)
Every where I seem to look there are troll items all over. The most popular being the Troll hat for kids. And is it ever cute. It was even suggested to me by a friend to make some in our little town. So today I am off to make my first troll hat. Hoping it turns out cause as you know I don't go by patterns I make my own as I go along.
There are going to be 2 different kind of troll hats that I plan on making. There is going to be the full troll hat. And I am going to try and do up a Pony Tail Troll hat. As I start this blog I haven't started to make them yet. As I go write more, I will be building the hats. That way I can take pictures and post my progress. Okay. Lets start.
Here is what I used to make the hats and the terms I used to write out the pattern which you can purchase HERE The first 100 buyers will receive 25% off purchase price. Use coupon TROLLS
US Terms used to make hats.
CH - Chain
SS - Slip Stitch
SC - Single Crochet
DC - Double Crochet
LDC - Linked Double Crochet
US H/5mm hook
Worsted Weight Yarn (can use bulky yarn for hair as well if wished)
Here I have got the troll part way done. Now I just have to do the hair.
Before Ears and Hair
Ears are now on
UGH Hair. I'm starting to hate hair.
Hairy Scary
Decided it needed a headband
Well I have completed this troll and now to make a few more to put up for sale. I do so hope you love your new Trolls Hat. I would love to see pictures. If you are on ravelry would love to see project linked to pattern. Next one I will take more time brushing the hair.
Love to create.
Happy Crocheting
Reney
Trelenberg Designs
Country Wife
Hi all wonderful crafters.
I do hope your having a wonderful day.
Today I share with you my newest pattern. C2C Country Cabin Baby Blanket. The video that is attached is one that will help you with the pattern should you need it.
I still haven't figured out what kind of border I should do for this one. And I didn't put a border in the pattern as everyone has their own thoughts on it and it should be your own personal touch.
In the pattern I have also added pictures to show the stitches and how I went about doing the Corner to Corner. I do hope it helps and that people enjoy making this blanket.
Without the border it measures approx 32x32 inches. I am thinking of making bigger ones and putting my kids names on them so that they each have their very own blanket.
This is personally only my second time doing the C2C and I like it as when you hit the half way mark it just keeps getting quicker then. Which is nice cause blankets do take a long time to make.
Good Afternoon wonderful crafter's.
Today I am taking me turn at learning how to make crab apple jelly. That's right. I have never made it before so this country wife is doing her first attempt. I searched online looking for a recipe but like all there is so many that does a person really know. Nope so I'm kinda following but winging it at the same time.
All common things were remove stems and bottoms and any blemishes. Wash apples off. So got that all done and put them into stock pot to cook.
Yup Apples are cooking for 20-30 minutes. Hope this is all good to go.
While I wait for the apples to cook any guesses as to what else this country wife is doing. Ugh yup laundry. I don't think I will ever get caught up. LOL
Now back to the apples. After apples are cooked its time to strain them to make the jelly.
Taking me a while to strain the juice out but I did read that you can strain them overnight which is good and what I have done. Now because I don't have any cloth to strain the juice through I'm using coffee filters. Yup its taking me a while. I heated up the juice some to help strain it. Hopefully it doesn't hurt it any.
Now to measure how much juice I have to figure about how much sugar I need. Now most of the recipes I've come across use a lot of sugar to me. No thanks. So here is what I did.
1 C Crab Apple Juice
5 tsp Sugar
Stir to dissolve sugar
Cook for about 40 minutes on a roiling boil. Don't forget to skim the froth off the top as it cooks
To know if its been cooked long enough cool off some spoons and test by putting some of the jelly on the spoon and see if it sets. If not cook a bit longer.
I do hope mine turned out right.
I put some canning jars into some water and boiled so that they were nice and hot. Put jelly in and put the lids on. Oh this is my first try and its a little nerve wracking.
I started out with 11 cups of juice and wound up with 4 250 ml canning jars. That was a lot of vapour lost so not sure if I did something wrong to lose that much but when you think about it you are going to lose a lot at a boil for 40+ minutes.
Well I have finished up my first experience at canning anything. Now just hope it turns out. Let it cool and we shall see. 😅💖
Well that is all for today. I will post an update in the comments section once I open a jar up and see how it turns out.
I have 2 wonderful cheerleaders to help me out.
Yes they are quite the cheer leaders 💖
Sitting here wishing that I could help my parents out right now. My parents are awesome people and I wish that I could help. But with me being a stay a home mom I can't come up with the money to help mom and dad right now which is really bothering me. My parents are both hard workers and have helped me out in so many ways that I can never repay them. All I want is to be able to help them out some. Having to move and dad didn't get a chance to work this summer as he was hired on a logging company and the whole area around them is on fire.
Yes the picture of this fire isn't that far from my parents which scares me
I have started a gofundme in hopes or raising some money to help out but not sure what my chances are with even getting a dollar on there as there are so many causes on there.
Well I am currently working on a new pattern again. This on is going to take a bit of time as I am planning on making it in both crochet and knit. Same design but this way it wont matter which craft you are into you will be able to make this beautiful blanket.
Blanket will be called Country Cabin and we right now I have the design done but still need to make it. And to make it I need to get more yarn.
This is one I can't wait to share as in my mind it looks so beautiful. Now to get the yarn and make sure that it turns out the way it should before I actually post a pattern.
Now quick question. Favorite way to crochet a blanket
Corner to Corner or One end to the other. Might even do the pattern both ways. And pattern will be tested before release.
Well now that I have it all planned I had better get going. House work today and hopefully soon I can make it to a store to start working on it. And then have to decide what size it will be when all done YIKES. wonder if I can do it where it can be any size. I should be able to, guess time will tell.
Well I hope everyone as a crafty day and cant wait to share more.
More helpful videos will be released soon as well.
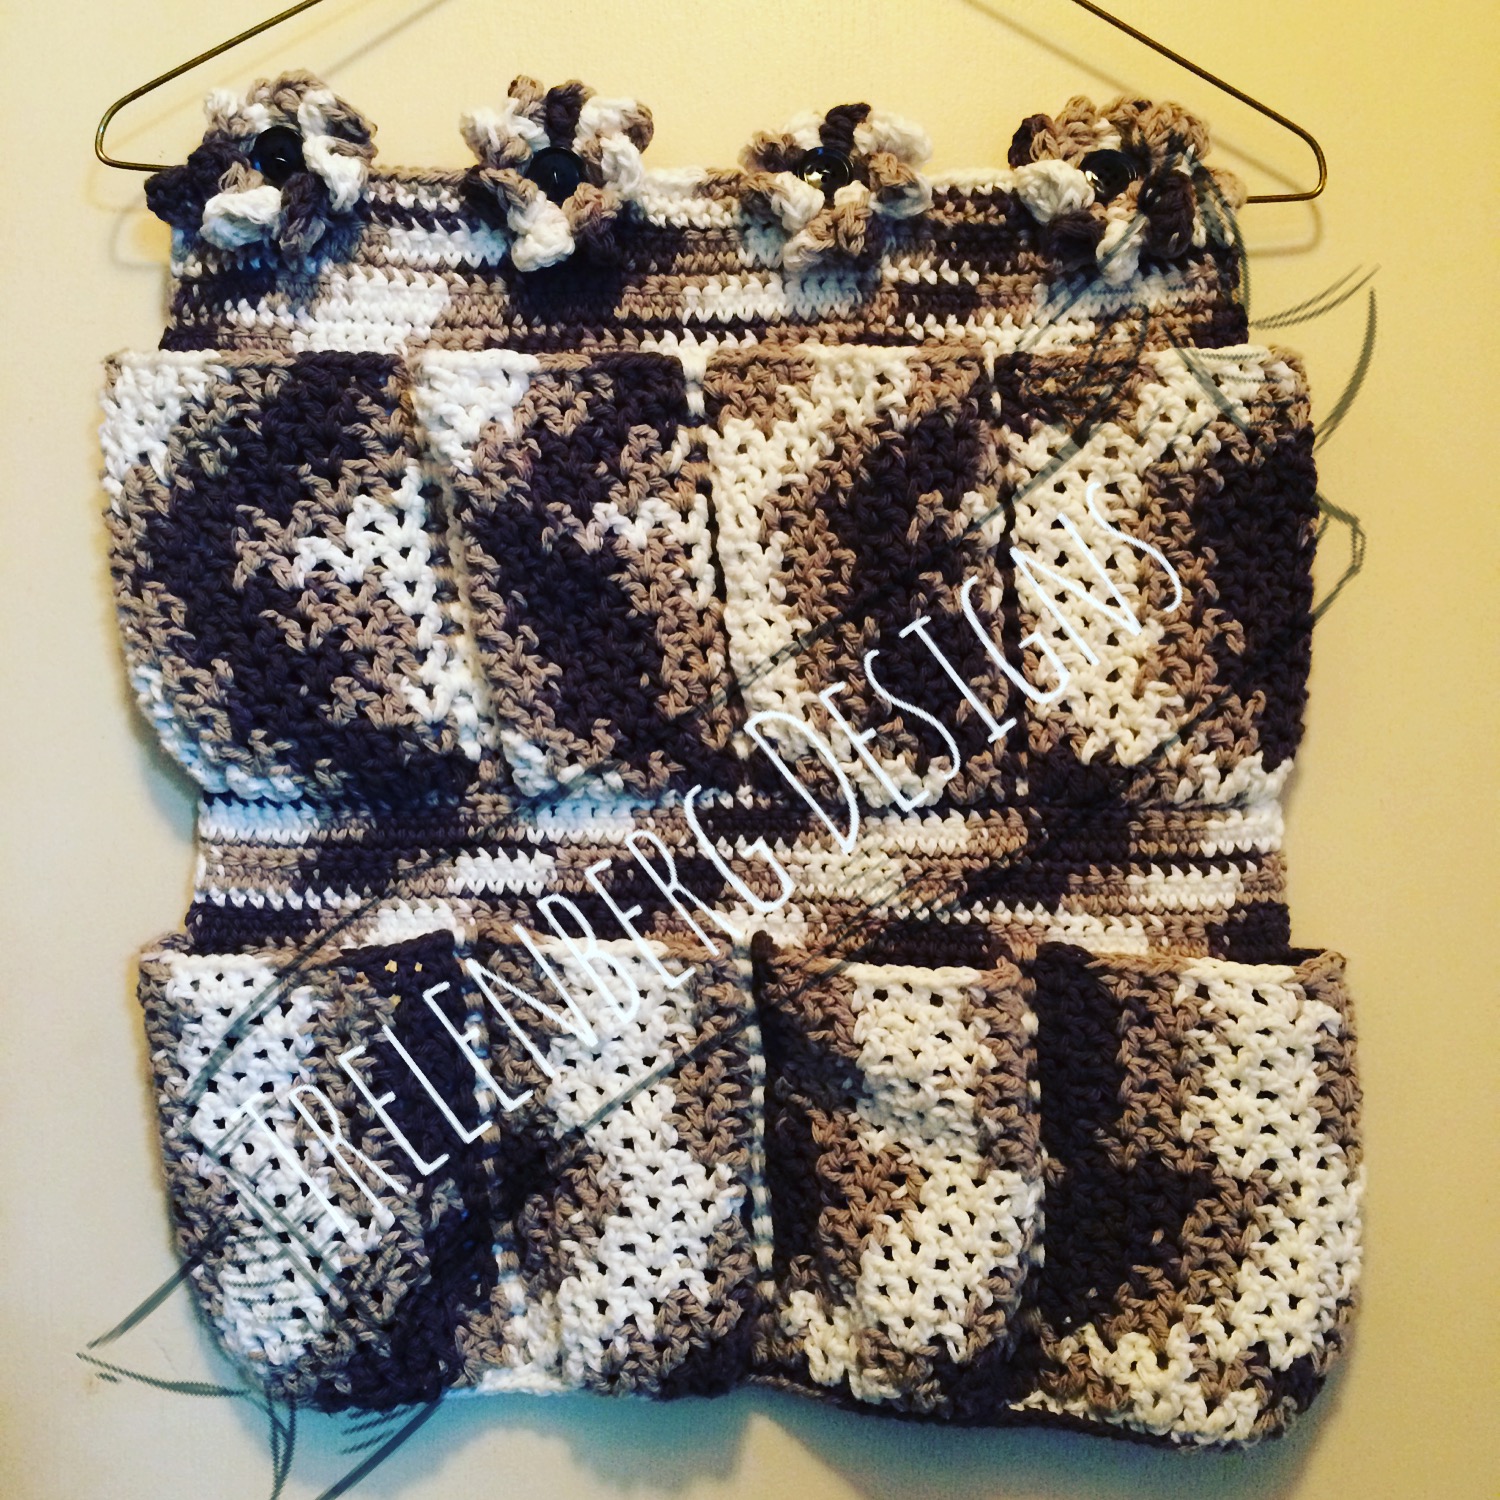
Do you wish that you had more room to store a few things. Say in the bathroom or your travel trailer/camper. Do you love to crochet. Well, How about building yourself a Hanging Organizer.
Give you a lot more storage and can hang on the bathroom/bedroom door or even hang in a closet.
Now to figure out what to store it it. Well the pockets are big enough to store your bathroom necessities such as shampoo and conditioner and other toiletries, or you could store your cleaning supplies like toilet bowl cleaner, window washer Mr. Clean and keep it hung up out or your little ones reach. There are lots of different ideas for what to put in the hanging organizer. And its completely up to you as to where you put it and what you use it for.
Like to make and know of family and friends that could use one. Yup build as many as you wish. And because you have taken the time to build it plus bought all the supply's needed and the pattern well you know what SELL them. That's right I have no problems to you selling the finished product as it is you that took so much time to make it. Please don't give or sell my pattern but any pattern that is bought from me you can make the product and sell as little or as many as you want. 💖
The pattern for this organizer is written so that it is built from the bottom up and you don't have to seam any part of it. I hate seaming and if I wanted to be a seamstress I would but NOPE I work with yarn and hate seaming so my patterns if possible are built with no seaming. Yes I know I'm stressing the point but I can't help it as I know lots of people that don't like to do seams either so I know I'm not alone.
Now where can you find the pattern? Well you can find The Seamless Hanging Organizer on: Ravelry,Etsy, and Craftsy.
Till Aug 18, 2017 You can get the pattern for 25% off no coupon required. Only on Ravelry
Have you ever thought about learning how to knit but you were always scared to. Well I hear where you are coming from. I tried knitting when I was little. My mom and both grandmothers tried to teach me. I was the unteachable. That is up till I was 30. Then I decided to give it a try again.
After learning how to crochet when I was 27 I decided it was time for me to try again. Bought my self some needles and yarn and well now what. I found a wonderful site online called Craftsy and bought myself a couple classes. Needless to say I now have quite a few classes on there and still so much to learn. I go back and watch them different time and now I am helping my nephew learn as well.
After learning some on Craftsy I figured out why I couldn't seem to get it when I was younger. The cast on. I hated it cause I always had way to much yarn at the end of my first knit row. Grandma taught me how to cast on using the backwards e method. Not my favorite and one I shall never use again. Now for casting on I use either the a crochet cast on, long tail cast on ( a couple different versions). I would love to help others learn how to knit so I am going to also add a couple of videos here to show you how I do these cast on's. I do hope you enjoy.
Here I will start of showing you how to do the crochet cast on. I use this on bigger projects when I get tired of trying to figure out how much tail I need for the long tail (use long tail on smaller projects).
I am not talking in these videos due to surrounding noise of 2 very energetic kids. (1 and 7)
Here is a video of my crochet cast on. Please feel free to let me know what you think.
Now for the long tail cast on. Here I did 2 different kinds. The first is your regular long tail. I do it without the slip knot in it. (My preference), and then after I put the stitch marker in I do a long tail cast on that is stretchier and works good for 1x1 rib.
I do hope these video help you to start. There are a lot more different ways to cast on but for me these are the ones I use.
Did you notice the craze for the winter bun hats. I know I sure did. They seemed to be everywhere you looked. Everyone wanted one. Well how about in the summer when lots of women wear sun hats. Yup that's right how about a sun hat that is perfect for your messy bun/pony tail.
Sizes ranging from toddler/small child up to an adult.
How cute is this little sun hat. A neat hole at the top for your bun/pony and if you don't want the hole just tighten the tie up and bam you no longer have the hole but you now just have a sun hat.
Would you like to crochet up your very own Messy Sun Hat. If you would you can find the pattern HERE for Ravelry Users, Not one for using Ravelry that's okay cause you can also find the pattern on ETSY and CRAFTSY.
Need a little extra help on the pattern. I have added pictures and video to my pattern to help everyone along. Just starting out or been crocheting for years. I do believe anyone can make this hat.
I do so hope you enjoy your new hat. Doesn't take much yarn and doesn't take much time.
Happy Crocheting to all. Have a fabulous day.
Reney
Trelenberg Designs
Hello wonderful crafters.
I am looking to get some of my patterns tested. I am doing the testing on Ravelry so testers have to follow the forum rules. If you are interested in testing the 1 I have going right now is for the knitted egg apron.
Follow the link to find the test. Egg Apron Test
Any patterns after this I will have a test link in the side bar along the blog.
Pattern is written out for 3 different amount of pockets and would like 2 testers per size. I do hope this tests runs good. Tester gets a copy of the final pattern at no charge.
On Tuesday we had our local farmers market. I decided to try it as a vendor and hope I could sell a couple of things.
Very excited that I was able to. Some of my freezie cozy's and some of the reusable water balloons plus 2 of my egg aprons (patterns for egg aprons are in my pattern stores Link to the right of blog).
I apron I did in crochet and the other in knit. I was told by the lady that bought them that I had better make more as she has lots of friends who love their chickens. So now to find the time and get more yarn to build some more. It tough with little one but I shall do it. I do still have yarn at home so I will start there as wont be going to a store for more this week.
I know didn't have much on my table but just starting out. What else would you wonderful people suggest for a farmers market in the summer. I don't want to get to much as not very many people in this town but would like a little more variety so any suggestions are welcome.
The hats you see on the table are currently in testing stage of the pattern and hopefully good to go by the 1st of August. You can find the water balloons and freezie cozy patterns on my blog with videos to show you how to make them as well for people that have trouble reading patterns. I find both are handy as with the freezie cozy's my son isn't complaining about cold fingers and using all the paper towel and the water balloons are a blast. If warm enough today I'm going to have a water fight with him hehehe.
Well I guess I had better get off of here and get at something. Hmm build with yarn or clean house hmm hmmm .
Wishing everyone a fabulous day.
Good Morning Crafters. I do hope your having a wonderful day.
Well being that it is summer time here in Canada and kids are eating freezies like they are going out of style but whining that their hands are cold I thought why not make a cozy for the freezies to keep their little hands warm. Oh what a crazy thought that was cause now they think they can get more freezies. LOL
Making a basic Freezie cozy is quite simple both in Knit and Crochet.
With the knitted version I went ahead and did it like double knitting but you could easily change that to the magic circle or use double points. Whichever you are most comfortable with.
Here are my basic versions of the Freezie cozy wrote out with video just for all the crafters out there. I am writing these for free but if you would love to check out my other patterns just follow the links at the side of this post.
Both Patterns are written for 4 medium weight yarn and I personally used Bernat Handicrafter Cotton
Okay lets start with the knitted version.
5.5mm / US 9
Double Knitted Version
Using Long tail cast on (or preferred method of Cast on)
Cast on 6, turn
KFB all 6 stitches (12)
All Remaining rounds you will K the odd numbered stitches and Slip even numbered stitches purl wise with yarn in front till desired length.
Magic Loop/ Double point Version
Using Judy's Magic Cast on Put 6 stitches on each needle
Knit in rounds till desired length. After 1st round with DPN separated your stitches so there is even number or stitches per needle (4 needles you will have 4 per needle and with 5 needles you would have 3 per needle.
Now on to the Crocheted Version. US Terms
5.5mm / US I Hook
CH6, SC in 2nd CH from hook, SC across CH Turn, SC along other side of CH, Join with a ss to 1st SC
CH1, HDC into same stitch as SS, HDC in every SC.
HDC into top of each HDC until you get to desired length
Fasten off weave in end and keep your hands from getting cold
I do hope you and all the kids enjoy their handmade with love Freezie Cozy.
Happy Knitting and Crocheting
Reney
Trelenberg Designs
Good Morning Beautiful Crafter's. I do hope everyone is having a fabulous day.
Here the sun is shinning and I'm looking forward to taking the kids to their swim lessons and then tonight I'm off to Aqua fit.
Speaking of summer things like swimming how about water balloon fights. They are fun but ouch them water balloons can hurt. Hmm well how about knitting and crocheting yourself some reusable water balloons. That's right make them. I will even walk you threw making them. And just to let you know no they don't have balloons in them its just the yarn soaking up water and they don't hurt when they hit you. Yes I've tried them out personally in a water balloon fight with my son and nephews.
First I will walk you threw crocheting them. 2 different styles due to using 2 different sized yarns.
The first one I will use Bernat Blanket Yarn. Very thick
Crochet US
CH - Chain
HDC - Half Double Crochet
SS - Slip Stitch
H2TG - Half Double Crochet 2 together
P - Puff Stitch - (YO, slip hook through stitch YO, pull through) 3 times, 7 stitches on hook. YO pull through 6, YO pull through 2 [YO - Yarn Over]
P2TG - make 1 Puff stitch across 2 puff stitches to decrease. (go into 1st stitch once and second stitch twice)
Bernat Blanket Yarn
8.0mm / US L
CH3, SS into first ch to form a circle
CH1, sc 6 into center of circle Join to 1st sc
Ch2, HDC2 in each SC (12HDC) join to top of 1st HDC
CH2, HDC in each HDC (12HDC) join to top of 1st HDC
CH2, HDC in each HDC (12HDC) join to top of 1st HDC
CH2, H2TG till start of round (6HDC) join to top of 1st HDC
CH2, HDC in each (6HDC) Join to top of 1st HDC and fasten off
#4 worsted weight yarn (Acrylic)
5.5mm / US I hook
CH3, SS into first CH to form a circle
CH1, SC 7 into the circle, Join to 1st SC with SS
CH1, P into each SC (7 Puff Stitches) join to top of 1st P with SS
CH1, Make 2 P in each P (14 Puff Stitches) Join to top of 1st P with SS
CH1, P in each P (14 Puff Stitches) Join to top of 1st P with SS
CH1, P in each P (14 Puff Stitches) Join to top of 1st P with SS
CH1, P2tg using all P (7 Puff Stitch) Join in top of 1st P with SS
CH1 HDC in each puff for balloon top. Join and fasten off
Knitted Version using Bernat Blanket Yarn
15US 10mm circular knitting needles and worked in the round. You can easily use double pointed as well but I didn't have any that big.
Here are the very easy instructions for making your very own knitted water balloons.
Terms used to make balloons
K - Knit
KFB - knit front and back of the same stitch K2TG - Knit 2 together
BO - Bind off using Russian Bind off to give a little flare
Using Long tail Cast on method
CO 6 stitches (if working on circular needles have it split 3/3 or if using DP split 2/2/2)
Row 1 - KFB, K1, KFB, KFB, K1, KFB
Row 2 - Knit
Row 3 - KFB, K3, KFB, KFB, K3, KFB
Round 4 -Knit
Round 5 - Knit
Round 6 - Knit
Round 7 - Knit
Round 8 - Knit
Round 9 - Knit
Round 10 - K2TG, K3, K2TG, K2TG, K3, K2TG
Round 11 - K2TG, K1, K2TG, K2GG, K1, K2TG
Round 12 - Knit
Round 13 - Knit
Round 14 - Knit
Bind Off
Take the tail and tie around the top of the balloon so that it looks like the balloon is tied.
Happy Knitting. And have a great balloon fight Reney Trelenberg Designs
Hello all I thought I would give you a little insight as to who I am. I am born and raised ranch lady who was raised back in the boonies of the beautiful British Columbia, Canada. I am now a mom of 2 wonderful (handful) children who light up my world and woman to a man who loves me.
I started out trying to learn how to knit as a wee little one but there was just no way. I always figured it was impossible to make anything with yarn and needles. BOY was I wrong. Back in the fall of 2010 when my son was just a little. I decided to give it another try and started out crocheting by watching different videos on YouTube. I was able to learn different stitches and started out making scarves and tuques. Then when he was about 2 so in 2012 I decided I wanted to learn how to knit so I found the website Craftsy and bought a couple of the classes still very skeptic but low and behold I figured how to knit. Now I'm not saying that I know a lot but the little that I do know managed to get me started. Then I tried following a pattern and oh boy I was excited I got a start but then I got bored and well my project changed as I started doing different things. Found out then that no matter how I tried following a pattern just wasn't for me as would get bored with the same stitch and start changing things. So from there I just started wining it. Loved how things were turning out. Then I shared a picture of a project I had done with a group on Face book and was asked where they could find the pattern. UMMM well there was no pattern and I let them know but that got me thinking. If I couldn't follow a pattern but did my own thing maybe just maybe I could try and write a pattern. I know that even sounded crazy to me.
Well even sounding crazy I decided to try it. So there started my journey in early 2017. Then a friend got a hold of me asking if I could build something for her. So I did and wrote the pattern for it in knit. But what about it crochet. Yup managed that as well and now I have patterns for both knit and crocheted Egg Aprons. Best part I did it where a person didn't have to sew the pockets on. I hate seaming and try to avoid doing it.
Well now that I have some pattern made its been bugging me that I couldn't figure out how to get them tested. Then found a wonderful group on Ravelry of people that are willing to test patterns for free. So I have 1 that has completed testing and 2 more currently in testing. I am planning on getting all patterns tested.
I find relaxation in both Knit and Crochet. So I shall continue on this wonderful journey and hope I can come up with items that people love.
Thank you everyone for all your interest in my designs and any questions about my patterns feel free to ask away.
Love Eggs Collect them safely with an Egg Picking Apron
I would love to thank the ones that tested my Egg Picking Apron Pattern for me. I so much appreciate it. The updated pattern has now been linked to. I so love the look of all the ones that helped me out. You can find a couple of the pictures under projects on theRavelry Page.
For the rest of July 2017 I am going to give 25% off the pattern no coupon required.
Would you love to make your very own egg apron. With this pattern you don't have to seam any part together. I hate seaming and I know a lot do. I will avoid patterns that require seaming I hate it so much. If I wanted to sew I would but I don't 😂. The Egg Picking Apron is worked from the bottom up and you can make how ever many pockets you wish. Each pocket measures about 2.5 inches wide and holds the eggs securely. I would love to see pictures of the finished of aprons. And you can make as many as you wish as you as you buy the pattern then the yarn and spend the time making it. Make to keep, make to gift and make to SELL. Yup do as you please with the finished Apron. Only request is do not give or sell my pattern as your own. Thank you I wish you happy crochet and my you enjoy your apron. Can be made for your little ones play apron for their toys as well.
For the rest of the month of July 2017 I have the pattern for 25% off and you can find it HERE


